My mother's 75th birthday party is on Saturday and I have planned a big family shingdig. At least 60 people and 1/3 of that is kids 8 and under. Here's the progress as we move through the week of April 18-22.
Dipping Oreos into blue candy coating
Making the centerpieces including printing out photos to put in them.
Get containers for candy buffet filled.
Fill plastic Easter eggs. (With all those kids, an Easter egg hunt was a natural.
April 19
Today was not as productive as yesterday. We started with the sugar cookies but then I had to go and get an MRI on my knee. Then we had to go to Wal-Mart and get some more stuff. Then we had to run and pick up Spencer and by the time we got home it was dinner time. I started mixing up the royal icing which I had never made before. It took awhile to get the color and consistency right. Then we were all tired but we got some of them done.
April 20
Although this was going to be cake pop day, we had to finish the cookies first. We set to work on them and then Pat came home from WalMart with 16 dozen refrigerated Easter sugar cookies. He felt sorry for me so he baked them. It was a lot more than we needed but we figured that there would be a lot of kids there so they could take them home.
Then we got busy with the cake pops. We were going to do batches but stopped after the carrot cake and cream cheese ones. Here's a shot of them:
April 21
Cupcake day but first I had to take Pat to the VA Clinic to have his sore shoulder checked. He fell a couple of weeks before at one of Spencer's baseball games. The doctor wanted it x-rayed so we had to go to the hospital. Fortunately, Laura was at our house and baked all of the cupcakes. When I got home mom and I frosted the cupcakes while Laura went to get Spencer from school. We were tired and we took a look at the intricate design that we needed to pipe onto the cupcakes and it just seemed to be too much. Right next to it in the cupcake book there was a simple cupcake with M&Ms on it that was cute. So we did chocolate cupcakes with chocolate frosting with a Tiffany Blue Sixlet in the middle and the blue chocolate covered sunflower seeds around it in the shape of a flower. The other cupcakes were white with sprinkles in them. We colored the frosting with sprinkles blue and then put M&Ms on them. Here is Laura, Chantal and Isabella fixing up the cupcakes.


This was also the day to finish everything so we printed out lots and lots of photos of mom to attach to ribbon to hang around the room. I also did the labels for the food and cut out some doilies with my Cricut. I used Sure Cuts A lot of print the labels and then cut them out. It was the first time doing that and it is so cool. We also had to pack it all up and get it into the cars. Yep, cars. We were taking Laura's kids so we put some of the stuff in Mom and Laura's cars.
April 22
We drove to Porterville with a pitstop to get some more tablecloths and cups at Party City in Fresno. The three kids were great. We pulled over on J59 and saw the buffalo, ostrich and a camel. We sang along, clapped and danced in our seats to John Denver's "Thank God I'm a Country boy." It was so much fun and we did it over and over.
April 23
We got up a bit late and did not get to the clubhouse until almost 9:30. Skip and his friend Dusty's wife and Joanne had already unpacked the stuff from mom's car. We all set to work and things went along pretty well. Here are pictures of the final results:
Notice the matching tiered stands? They look so nice and I made them. I took plastic dinner plates from Party City and hot glued them together with glass candlesticks from Dollar Tree. The set of 10 large plates was $9.99. The set of 10 small plates was $4.99. Of course, the candlesticks were $1. For the tallest stand I used two large plates ($2), one small plate ($.50) and three candlesticks ($3) for a total of $5.50. Cheap for a tier cake stand that matches the color scheme. I took them apart and saved the candlesticks so I can do it again with the same 12 candlesticks that I bought.
Mom with Isabella and Spencer. She cried as we started but had a great time. That's my husband in the back with his arm in a sling. He did so much to make the day a great one.

Our color scheme was the first thing we decided on and it came from a cupcake design in Hello, Cupcake. It has chocolate frosting with blue chocolate covered sunflower seeds. I went to

Michael's to look for paper to make the invitation and get the sunflower seeds and I saw these great flowers that were the exact color that we needed. I bought one and figured I would come back and get more if I decided to. I then went to Beverly's because I hadn't found the right paper at Michael's. There was a similar flower at Beverly's but it was a little lighter in color and smaller. I bought one of the flowers to compare. When I got to the car, I looked at the receipt from Michael's and realized that they had been on sale and were only $1.39 each. I went right back to Michael's and bought a bunch of them even though I wasn't sure what I would do with them. We started looking for some options online and Chantal found the perfect vases at Dollar Tree. We bought the blue-ish glass discs to fill the base with and put in the photos of mom and ribbon on the top. Three flowers in each vase- about $4.50. $1 vase. $3 for the glass discs. The ribbon was bought by the roll and was about $2 for the whole thing so it was probably $.25. Total $8.75 for each plus a lot of photo ink. I'm very happy with the results. We're keeping the vases, discs and flowers for another event.

This is the beverage table. We decided on root bear with blue cream soda to match the color scheme. I was so glad when I found the cute dispensor for only $15 at WalMart. I put a doily that I cut out with the Cricut under it. And a great find was the beverage tubs in the exact color that we needed at Walmart for $9. We had way too many sodas but I always like to have more instead of running out.


 I'm really getting into creating with books now. For my library every month I decorate this manzanita branch tree. This month I printed Halloween images onto book pages and cut them out with decorative edge scissors, cut out black tags with my Cricut and glued the images to the tags. Tied those on with orange ribbon with black dots. I added some Halloween skeletons and a rubber rat from Dollar Tree.


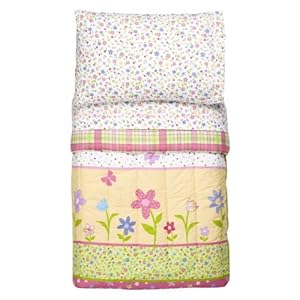 A year ago my granddaughter Isabella turned 3 and I decided that for her birthday present we should fix up her bedroom. Now her bedroom is very, very small so I figured that jazzing it up would be a good idea. Isabella already had this Happy Flower Toddler Bedding. We wanted to work with it so her mother Laura planned to paint three walls of the room pink and put a mural matching the flowers in the bedding on the other wall. She also wanted stripes on the bottom of the walls all the way around and a white stipe with dots in it. It took us a better part of my week of Spring Break but it was worth it.


 Here's Isabella with the bookcase that her Papa made for her. It was actually an existing bookcase from her room and he just painted it and added the top. Isabella loves it. Notice that she had to put on her princess clothes to get her picture taken.


 Michael's to look for paper to make the invitation and get the sunflower seeds and I saw these great flowers that were the exact color that we needed. I bought one and figured I would come back and get more if I decided to. I then went to Beverly's because I hadn't found the right paper at Michael's. There was a similar flower at Beverly's but it was a little lighter in color and smaller. I bought one of the flowers to compare. When I got to the car, I looked at the receipt from Michael's and realized that they had been on sale and were only $1.39 each. I went right back to Michael's and bought a bunch of them even though I wasn't sure what I would do with them. We started looking for some options online and Chantal found the perfect vases at Dollar Tree. We bought the blue-ish glass discs to fill the base with and put in the photos of mom and ribbon on the top. Three flowers in each vase- about $4.50. $1 vase. $3 for the glass discs. The ribbon was bought by the roll and was about $2 for the whole thing so it was probably $.25. Total $8.75 for each plus a lot of photo ink. I'm very happy with the results. We're keeping the vases, discs and flowers for another event.
 This is the beverage table. We decided on root bear with blue cream soda to match the color scheme. I was so glad when I found the cute dispensor for only $15 at WalMart. I put a doily that I cut out with the Cricut under it. And a great find was the beverage tubs in the exact color that we needed at Walmart for $9. We had way too many sodas but I always like to have more instead of running out.
